
About a year ago, my momma started talking to me about a chocolate mousse pie. Or, more specifically, a chocolate mousse pie whose mousse was so delectable that she and my stepfather decided to eliminate the crust, and therefore the element that made the dessert a “pie”, altogether. They’d served the mousse at a few dinner gatherings and even to my stepbrother (who is notoriously picky and known to complain about most dishes that come from our parents’ kitchen) with much success. “You’ve GOT to make it sweetie”, she’d say, “Its just soooooo yummy!”

I put it off because, honestly, I’m not a big chocolate mousse fan. Give me a slice of
moist chocolate cake with raspberry filling that oozes from its interior, or a rich chocolate cheesecake so dense that your tongue has to work to break it down in your mouth, even a
petite chocolate cupcake with berry-flavored buttercream. But chocolate mousse? Eh. I can take it or leave it. When it comes to dessert, I like each bite to be substantial. None of this “melt in your mouth” or “light as air” stuff for me. I even like my ice cream extra thick so that each spoonful lingers for seconds longer than the regular stuff.
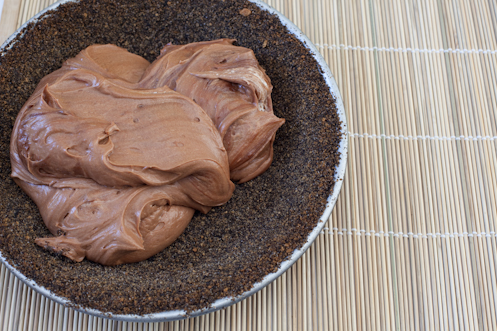
But my momma, she’s stubborn. She was determined that I would like THIS chocolate mousse and so added it to the dessert menu for our Christmas meal last year. I’m willing to try anything, but honestly, I was looking forward to the
coconut mango white chocolate bread pudding WAY more than the fluffy, mocha-hued blob resting in the refrigerator. The time for tasting came and I dropped a small serving of mousse next to my [much larger] mound of bread pudding. I dipped my spoon in and brought the chocolate fluff to my mouth. My eyes closed as my tongue deciphered the flavors resting on it - the rich dark chocolate mingling with the tang of buttermilk, all lightened to the silkiest texture by the homemade whipped cream folded in. I did a little shimmy in my seat, the classic food dance that lets everyone present know that I am very, very happy. And then I took another bite. And another. I was completely, totally, hopelessly hooked.
When the
C’ville Pie Fest was brought to my attention a couple of weeks ago I, of course, emailed my Momma for her opinion on what I should make. She, of course, said “Chocolate Mousse Pie!” (its her standard answer for most of my “what should I make for dessert” questions...). I didn’t think it was such a good idea, since I wasn’t sure how the mousse would hold up outside of the refrigerator for multiple hours. And room-temperature mousse pie is messy - its not the kind of pie that wins you big points in the “appearance after sliced” category. I did, however, add her suggestion to my list for
Bella Eats Pie month knowing that I would not only be sharing a worthy recipe with all of you, my readers, but I would also be pleasing my Momma. And who doesn't love to please their momma?

There's something you should know about me...I'm a tweaker. I like to experiment with recipes, especially baked goods, to make them my own. My momma sent me the chocolate mousse recipe, which my stepfather had modified slightly from
Emeril, and I immediately started thinking of ways to improve it. I debated various crusts and other layers that I could add to the pie, resting finally on an idea inspired by Helen of
Tartelette...salted caramel mousse. The mere thought of the rich dark chocolate paired with salted caramel swirling around my tongue actually evoked the food dance from me way before sugar, cream or butter ever came into contact on my stovetop. Very excited by my own brilliance, I called my momma to brag about the sure-to-be-delectable pie that I'd be making that weekend. She gasped and ooh'd and aww'd appropriately, then turned to my stepfather to tell him of my plans.
"Why", he asked,
"would she want to do that? The mousse is perfect on its own!"

Determined to prove him wrong, I set to work last Sunday morning on my
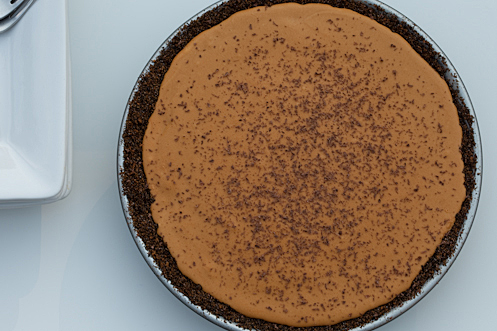
Chocolate and Salted Caramel Mousse Pie (pictured in photos above). I tweaked the chocolate mousse (
from Emeril) slightly, but made the crust as he specified. I made Helen's
Salted Butter Caramel, but instead of folding a mousse base into it after it cooled I folded in homemade whipped cream, creating more of a salted caramel cream that I then layered over the chocolate mousse base. It was all pretty loose, especially the caramel layer, so I stuck the whole pie in the freezer to let it firm up until we were ready to serve it to our evening guests.
There was much anticipation for dessert, especially from me since I had already given my pie a food dance without ever tasting it. We let it sit for a bit to soften then sunk the server deep into the pie's center, watching as it pulled the mousse toward the outer rim of the dish. Normal-sized slices were served, small enough that ten people could be served from one 9" pie. We all dug in and let out happy exclamations for each of the first three to four bites, and then started to slow down. Drastically. Because this pie was RICH. So rich that even I, queen of heavy, decadent desserts, couldn't finish a whole slice.
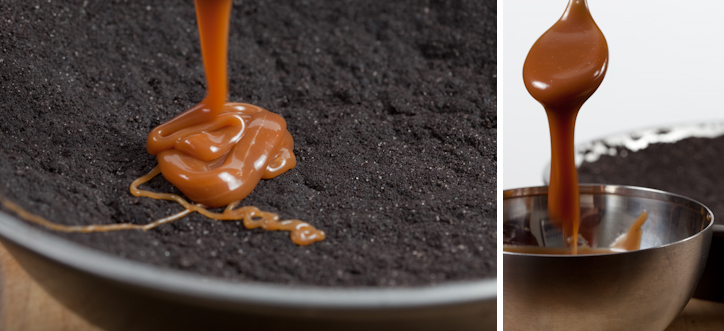
And so I moved on to plan B. I had this feeling that because both the chocolate and caramel layers were light and mousse-like, they oozed together in your mouth without maintaining their own identities and created a bite that was overwhelmingly rich. After some consultation with Brian and my Momma, I decided to try a pure caramel layer topped by the same chocolate mousse along with a new cookie crust, having not been completely thrilled with Emeril's mix of chocolate cookies and graham crackers in the first pie.
(Have I mentioned how easy it is to make homemade salted caramel? SO easy. TOO easy. There have been visions of caramel apples and caramel candies and caramel sauce for ice cream swimming in my head since I learned how easy it is. Yum.)
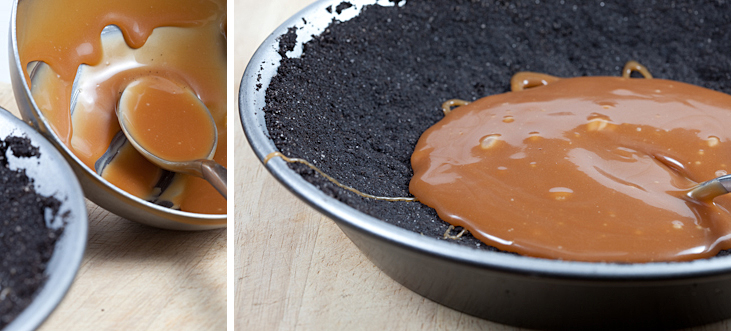
As it turns out, pure caramel doesn't adhere well to chocolate cookie crust. After placing a slice of pie #2 on a plate to serve, I watched as the mousse and caramel slowly slid down the length of the shell that was meant to keep the slice intact and maintain its shape. Even after an overnight rest in the freezer, it took a mere 5 minutes out before the caramel started oozing from beneath the chocolate mousse, lethargically making its protest at being forced to share the stage with another star.

Apparently, my parents DO know a little something about desserts - the chocolate mousse is perfect on its own.
So, here is my recommendation after this week of experimentation. Make the chocolate mousse. Put it into a chocolate cookie crust and place the whole pie in the freezer for a few hours. Serve with a generous blob of homemade whipped cream. Pure. Simple. Delicious. And if you're dying to try the salted butter caramel, DO! Just coat an apple with it or drizzle it over ice cream. It deserves its own spotlight.
Or better yet, follow Helen's instructions for her
triple-layer mousse. It looks delicious, and I bet that layer of vanilla mousse would really help to cut the richness of the chocolate and caramel layers.
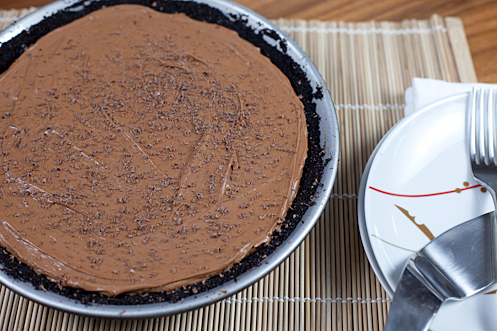 Chocolate Mousse Pie
adapted from Emeril's recipe on foodnetwork.com
serves 10
Ingredients:
- one 9" cookie crust, baked (recipe below)
- 1 cup plus 2 tbsp sugar
- 3/4 cup heavy cream, plus 1-1/2 cups
- 3/4 cup buttermilk
- 3-1/2 tbsp cornstarch
- pinch salt
- 4 egg yolks
- 4 oz high-quality chocolate (I used 60% cocoa), finely chopped
- 1 tbsp butter
- 3/4 tsp vanilla extract
- 3 tbsp confectioner's sugar
Method:
- In a small saucepan combine sugar, 3/4 cup heavy cream, buttermilk, cornstarch and pinch of salt, and whisk until smooth. Place over medium-high heat and bring to a boil, whisking from time to time until the sugar and cornstarch dissolve and the mixture thickens, about 5 minutes. Continue cooking at a low boil for an additional 5 minutes, whisking constantly.
- In a mixing bowl, beat the egg yolks lightly. Pour 1/2 cup of the hot mixture into the egg yolks and whisk thoroughly. Pour the egg yolk mixture into the saucepan and whisk over the heat until thoroughly combined and very thick, 1 to 2 minutes.
- Pour the mixture into a mixing bowl and whisk in the chocolate, butter and vanilla. Continue whisking until thoroughly combined (mixture will be very thick).
- Cover the mixture with plastic wrap placed directly on the surface of the mixture. Refrigerate until cooled to room temperature, about 30 minutes.
- Place 1-1/2 cups heavy cream in a chilled mixing bowl and add the confectioner's sugar. Beat until stiff peaks form (I used a stand mixer). Refrigerate until ready to fold into chocolate mixture.
- Remove the chocolate mixture from the refrigerator. Gently fold in about 1/2 of the whipped cream. Spoon the chocolate mousse into the cooled, pre-baked cookie crust. Refrigerate until firm and cool, at least 4 hours. (Or freeze if you want a really firm pie, one whose bites have more oomph to them. Just remove from freezer about 10 minutes before cutting).
- Refrigerate remaining whipped cream until ready to serve with pie.
Chocolate Cookie Crust
Ingredients:
- enough chocolate cookies, cream centers removed, to make 2 cups of fine crumbs (I used one package of Newman O's)
- 1/4 cup sugar
- 1 stick unsalted butter, melted
Method:
- Preheat oven to 375*F.
- Process cookies in a food processor until fine crumbs. Measure 2 cups into a mixing bowl. Add the sugar and toss to combine.
- Add the melted butter and use your fingers to combine thoroughly.
- Press the crumb mixture evenly into a 9 inch pie dish. Bake for 15 minutes.
- Let cool completely before filling.
And if you really want to try a caramel layer, here you go. The combination is delicious, really, just be glad that the pie keeps well in the freezer because it will take a looooong time to finish it all.
Salted Butter Caramel
from Tarteltte
Ingredients:
- 1 cup sugar
- 4 tbsp water
- 1 tsp fine sea salt
- 1/2 cup heavy cream
- 4 tsp unsalted butter
Method:
- Place the sugar and water in a medium heavy-bottomed saucepan and bring to a boil over high heat. Continue to cook until a shade lighter than caramel (it will continue to cook a bit after you remove it from the heat. if it overcooks the caramel gets a little bitter.).
- Remove from the heat and add the salt, stir quickly to dissolve. Add the heavy cream and butter, stirring constantly with a wooden spoon until completely smooth. Let cool to room temperature.
Salted Caramel "Mousse" (from pie #1)
Once the caramel is cool, fold in the other half of the whipped cream prepared for the chocolate mousse. The mixture will be much runnier than the chocolate, so layer it on top. Place in the freezer for at least 4 hours before serving.

Up next Thursday on Bella Eats Pie: Apple!
And, I'm going to try really hard to get some savory fall dinner posts up in between...
 About a year ago, my momma started talking to me about a chocolate mousse pie. Or, more specifically, a chocolate mousse pie whose mousse was so delectable that she and my stepfather decided to eliminate the crust, and therefore the element that made the dessert a “pie”, altogether. They’d served the mousse at a few dinner gatherings and even to my stepbrother (who is notoriously picky and known to complain about most dishes that come from our parents’ kitchen) with much success. “You’ve GOT to make it sweetie”, she’d say, “Its just soooooo yummy!”
 I put it off because, honestly, I’m not a big chocolate mousse fan. Give me a slice of
  But my momma, she’s stubborn. She was determined that I would like THIS chocolate mousse and so added it to the dessert menu for our Christmas meal last year. I’m willing to try anything, but honestly, I was looking forward to the
  When the
  There's something you should know about me...I'm a tweaker. I like to experiment with recipes, especially baked goods, to make them my own. My momma sent me the chocolate mousse recipe, which my stepfather had modified slightly from
  Determined to prove him wrong, I set to work last Sunday morning on my Chocolate and Salted Caramel Mousse Pie (pictured in photos above). I tweaked the chocolate mousse (
 And so I moved on to plan B. I had this feeling that because both the chocolate and caramel layers were light and mousse-like, they oozed together in your mouth without maintaining their own identities and created a bite that was overwhelmingly rich. After some consultation with Brian and my Momma, I decided to try a pure caramel layer topped by the same chocolate mousse along with a new cookie crust, having not been completely thrilled with Emeril's mix of chocolate cookies and graham crackers in the first pie.
(Have I mentioned how easy it is to make homemade salted caramel? SO easy. TOO easy. There have been visions of caramel apples and caramel candies and caramel sauce for ice cream swimming in my head since I learned how easy it is. Yum.)
 As it turns out, pure caramel doesn't adhere well to chocolate cookie crust. After placing a slice of pie #2 on a plate to serve, I watched as the mousse and caramel slowly slid down the length of the shell that was meant to keep the slice intact and maintain its shape. Even after an overnight rest in the freezer, it took a mere 5 minutes out before the caramel started oozing from beneath the chocolate mousse, lethargically making its protest at being forced to share the stage with another star.
 Apparently, my parents DO know a little something about desserts - the chocolate mousse is perfect on its own.
So, here is my recommendation after this week of experimentation. Make the chocolate mousse. Put it into a chocolate cookie crust and place the whole pie in the freezer for a few hours. Serve with a generous blob of homemade whipped cream. Pure. Simple. Delicious. And if you're dying to try the salted butter caramel, DO! Just coat an apple with it or drizzle it over ice cream. It deserves its own spotlight.
Or better yet, follow Helen's instructions for her
  Chocolate Mousse Pie
adapted from
  Up next Thursday on Bella Eats Pie: Apple!
And, I'm going to try really hard to get some savory fall dinner posts up in between...