Contact Us

Use the form on the right to contact us.

You can edit the text in this area, and change where the contact form on the right submits to, by entering edit mode using the modes on the bottom right. 


123 Street Avenue, City Town, 99999

(123) 555-6789

email@address.com


You can set your address, phone number, email and site description in the settings tab.
Link to read me page with more information.

Blog

Filtering by Category: pie

pear, ricotta + honey tart

Andrea

I have been a little obsessed with ricotta cheesecake lately.  I've made it several times, trying out a few different recipes, tweaking as I go.  I've landed on one that I love but cannot seem to get a decent picture of it to save my life. And, quite frankly, I can't continue to eat ricotta cheesecake every other week. That doesn't work with the ol' 'stay in my jeans' plan. While browsing the produce section last week I came upon these lovely red pears and knew that a Thanksgiving dessert recipe must be developed to showcase their beauty. And then I thought, why not combine that idea with what I've learned about the perfect ricotta cheesecake? Voila, a new dessert star is born.

This recipe combines three of my favorite things: seasonal fruit, tender crust, and ricotta cheesecake. Shared with loved ones it makes the perfect end to an Autumn meal. Enjoy, my friends!

Pear, Ricotta + Honey Tart
serves 8

for the crust
  • 1-¼ cup all-purpose flour
  • 1 tbsp sugar
  • 1 stick (½ cup) unsalted butter, cold, cut into ½-inch cubes
  • 4-5 tbsp water
for the tart
  • 16 oz whole milk ricotta
  • 6 oz cream cheese
  • 4 tbsp honey, divided
  • 1 egg
  • 1 tsp vanilla extract
  • 3 pears, sliced and pressed between paper towels to remove some moisture
method
  1. First, make the tart dough.  Blend the flour and sugar in a food processor.  Add the butter and pulse until the mixture resembles small peas, about 10 times.  Add 4 tbsp of the water and process until the dough comes together, adding the last tbsp of water if needed.  Gently gather the dough into a ball and press to a disk.  Wrap with plastic wrap and refrigerate for at least 1 hour, up to 2 days.
  2. Preheat the oven to 350°F.
  3. After the dough has been refrigerated, remove it from the plastic and roll flat to a circle approximately 12-inches in diameter.  Lay the dough across a 9-inch tart pan and press the dough to the bottom and sides of the pan.  Roll a rolling pin over the top of the pan to cut the excess dough.  Prick the bottom of the dough with a fork in several places.  Bake the tart crust for 10 minutes and remove from oven.
  4. Blend together the ricotta, cream cheese, 3 tbsp of the honey, the egg, and the vanilla extract until well combined. Pour the mixture into the tart pan and smooth the top.  Lay the pear slices across the top of the ricotta mixture, and drizzle with the final tbsp of honey.
  5. Bake for 45-60 minutes, until the tart only jiggles slightly and is starting to brown at the edges.
  6. Let sit for 1 hour before slicing and serving.

tomato + goat cheese tart with rosemary crust

Andrea

tomato goat cheese tart-5.jpg

Summer.

Tomatoes.

Summer. Tomatoes. Summer tomatoes. Summer tomatoes summer tomatoes summer tomatoes. The two words belong together, do they not?

With a high of 101° in Charlottesville today (real feel 115° to 120°...um, when did we move to the equator?!?), I am not finding a whole lot to be happy with Summer about at the moment. Except for tomatoes. We are overrun with summer's favorite fruit right now...big ones, little ones, red ones, orange ones. All picture frames and candles have been removed from my dining room sideboard to make way for our bounty from the farm. It is the official tomato storage and ripening spot in our house, a constantly revolving inventory of heirloom varieties. I've made pints of marinara to store away for winter, and have plans to can soups and salsas in the coming weeks. But still, my very favorite way to consume a perfectly ripe tomato is thickly sliced, with sea salt. It just doesn't get much better than that. Unless you sandwich one of those slices between two hunks of bread with some bacon...that's pretty darn good too.

Most of our meals this week involved, you guessed it, tomatoes. In sauce over pasta, in salsa on fish tacos, sliced with fresh mozzarella on pizza, the 'T' in our BLTs. And this lovely, simple, rustic tart. It breaks my 'don't turn on the oven' rule, but at least it isn't the stove top. 

tomato goat cheese tart-1.jpg
tomato goat cheese tart-2.jpg
tomato goat cheese tart-3.jpg
tomato goat cheese tart-6.jpg

First, I have to say again how much I love Jack Bishop's book, A Year in a Vegetarian Kitchen. I have shared several recipes from there, here, and cannot praise it enough. We have been thrilled with every single dish we've made between its covers, and love how simple and quick they always are. This tart is no exception. The crust dough comes together beautifully and is so easy to work. The filling ingredients are simple. The whole tart is finished with just 15 minutes of prep time, which I love. If the crust weren't so butter-full we'd have this meal multiple days each week.

Be sure to only make this tart when tomatoes are at their peak...a pink and grainy 'mater just wouldn't do...

Tomato + Goat Cheese Tart with Rosemary Crust

from A Year in a Vegetarian Kitchen, by Jack Bishop

Crust Ingredients

  • 1-1/4 cups unbleached all-purpose flour
  • 1/2 tsp salt
  • 1/2 tsp minced fresh rosemary
  • 8 tbsp (1 stick) chilled unsalted butter, cut into 8 pieces
  • 4-5 tbsp ice water

Tart Filling

  • 6 oz fresh goat cheese, crumbled (about 1-1/3 cups)
  • 3 medium, delicious tomatoes, cored, sliced crosswise 1/4-inch thick, and blotted dry between paper towels*
  • 1 tbsp extra-virgin olive oil
  • salt + freshly ground black pepper

Method

  1. First, make the crust dough (about 1 hour before you're ready to assemble the tart). Place the flour, salt, and rosemary in a food processor and pulse several times to combine. Add the butter and pulse until the mixture resembles pea-sized crumbs, about ten 1-second pulses. Add the water, 1 tbsp at a time, and pulse briefly after each addition. After 4 tbsp of water have been added, process the dough for several seconds to see if it will come together. If not, add the remaining 1 tbsp water. Process just until the dough comes together in a rough ball. Do not overprocess or the dough will not be flakey. Transfer the dough to a lightly-floured work surface and knead briefly to for a smooth ball. Flatten the dough into a 5-inch disk and wrap it in plastic wrap. Refrigerate the dough for at least 1 hour and up to 2 days.  Note: My dough was very sticky with just 4 tbsp of water, so I wound up adding some flour to help it to come together. The final dough should be smooth and supple before refrigerating. Also, if you don't have a food processor, you can still make the dough by using forks or a pastry blender to cut the butter into the flour mixture, then add your water.
  2. Move an oven rack to the middle position and heat oven to 375°. 
  3. Unwrap the chilled dough and roll it into a 12-inch circle on a lightly floured surface. Lay the dough over a 10-inch tart pan with a removable bottom, fitting the dough into the bottom and sides of the pan. Run the rolling pin over the top of the tart pan to trim the excess dough. Prick the bottom of the tart shell all over with a fork.
  4. Finally, fill and bake the tart. Scatter the goat cheese evenly across the bottom of the tart shell. Arrange the tomatoes over the cheese in two rings, one around the outside edge of the tart pan and another in the center, overlapping them slightly. Drizzle the tomatoes with the olive oil and sprinkle with salt and pepper to taste.
  5. Bake until the edges of the crust pull away from the sides of the pan and are golden brown, 45 to 50 minutes. Cool the tart on a wire rack for at least 10 minutes. Cut the tart into wedges and serve.  Also, it is really good at room temperature so feel free to make this ahead and let it cool for several hours.

* To dry tomatoes, lay 3 layers of paper towels on a flat surface. Place your tomato slices on the paper towels, and then cover with 3 more layers of towels. Gently press your hands over the tomatoes to extract as much liquid as you can without crushing the tomatoes. When you lift the slices from the towels, many of the seeds should stay behind. This will keep your tart crust from becoming soggy.

tomato goat cheese tart-4.jpg

blueberry lemon tartlets

Andrea

There have been a lot of sweets around here lately. I would apologize, but this little blog is a glimpse into my kitchen and sweets are what I am craving these days. Ice cream. And popsicles. And tiny tartlets with fresh fruit mounded on top. Even though Summer has officially just arrived, here in Virginia you'd think she'd been around for at least the last month.  And when Summer lands firmly on our dry + crispy lawn I like for the food passing my lips to be cool and refreshing, laden with flavors of citrus and berry. Of course, there are salads abounding as well, but salads aren't nearly as much fun to photograph, write about, or share here in this space. Except that I've been slicing kumquats to sprinkle overtop of my spinach lately and that, my friends, is a really good idea. If you can find kumquats in your area I suggest you give it a try, I think you'll be pleased.

While you're out, pick up a few pints of fresh blueberries, and then hurry home to whip up these sweet little tartlets. The blueberries are such a nice accompaniment to the sharp tang of lemon curd nestled within the butter pastry. You'll only need one of those pints for this recipe, but if you're like me you won't be able to resist eating berries by the handful as you prep. 

Oh! And if you're in central Virginia, pick up the Summer issue of Flavor Magazine. Not only because Flavor is a wonderful resource for sustainable eating in the Capital Foodshed, but because you may just recognize a photograph in the Pairings section on page 79...!

Happy Summer, friends!

Chantilly cream is one of my great pleasures. I experienced it for the first time at K-Paul's in New Orleans when it was served with my cafe au lait, and I just about licked the bowl. Sprinkled with dried lavender, it is a lovely accompaniment to sweet blueberries. Add in the lemon curd and butter pastry and you've got quite the divine dessert.

I should also note that I've never, ever been able to achieve a non-shrinking tart or pie crust. This recipe is suggested by Joy of Cooking for tartlets specifically because the pastry is not supposed to shrink, but, mine still did. Apparently pastry dough and I just don't get along. I'm working on it.

Blueberry Lemon Tartlets with Chantilly Cream + Lavender

crust and curd recipes from The Joy of Cooking, chantilly cream recipe from Chef Paul Prudhomme's Louisiana Kitchen

makes (6) 4-inch tartlets, with some leftover lemon curd and chantilly cream (darn!)

Pastry

  • 1 cup plus 2 tbsp all-purpose flour
  • 1 tbsp white sugar or 2 tbsp powdered sugar
  • 1/4 tsp salt
  • 6 tbsp (3/4 stick) cold unsalted butter
  • 3 oz cold cream cheese
  • 2 to 3 tbsp cold heavy cream

Lemon Curd

  • 1 cup sugar
  • 8 tbsp unsalted butter (1 stick), cut into small pieces
  • 8 large egg yolks
  • 1/2 cup strained fresh lemon juice (from 2 to 3 lemons)
  • 1 tbsp grated lemon zest, plus more for garnish

Chantilly Cream

  • 2/3 cup heavy cream
  • 1 tsp vanilla extract
  • 1 tsp brandy
  • 1 tsp Grand Marnier
  • 1/4 cup sugar
  • 2 tbsp dairy sour cream

Assembly

  • 1 pint fresh blueberries
  • 1 tsp dried lavender

Method

  1. Place a medium-size bowl and beaters in the refrigerator, to be used for the chantilly cream.
  2. To make the pastry, whisk together the flour, sugar, and salt. Cut the butter and cream cheese into 1/4-inch pieces. Using a pastry blender or 2 knives, cut the butter and cream cheese into the dry ingredients until the mixture resembles coarse crumbs with some pea-sized pieces. Drizzle the heavy cream over the mixture and cut in with the blade side of a rubber spatula, or stir with a fork until the dough begins to gather into moist clumps. Press the dough into a flat disk, wrap tightly in plastic, and refrigerate for at least 1 hour or up to 2 days.
  3. On a lightly floured work surface, roll the dough about 1/8 inch thick, then cut into rounds wide enough to cover the bottom and sides of your tartlet pans, with 1 to 1.5 inches extra dough to spare. Press the dough rounds into the pans, then fold the overhanging dough back on itself over the crust sides, doubling their thickness. Press the doubled dough firmly to seal, then thoroughly prick the sides and bottoms with a fork. Arrange the crusts on a baking sheet and refrigerate for at least 30 minutes.
  4. Position a rack in the center of your oven and preheat to 400°F. Bake the crusts for 5 to 7 minutes, then prick the bottoms of any that have puffed. Continue to bake until the crusts are golden brown and firm to the touch, 12 to 15 minutes more.
  5. For the lemon curd, preheat your oven to 350°F. Combine the sugar and butter in a heat proof bowl. Bring 1-inch of water to a bare simmer in a skillet, and set the bowl of sugar and butter in the skillet. Stir until the butter is melted, and remove the bowl from the skillet. Add the egg yolks and beat until no yellow streaks remain. Stir in the lemon juice and return the bowl to the skillet. Heat the mixture over medium heat, stirring gently until it thickens to the consistency of heavy cream and lightly coats a spoon, 6 to 8 minutes. Strain the lemon mixture through a clean fine-mesh sieve into a bowl, then stir in the lemon zest.
  6. Pour the filling into the tart crusts. Bake the tartlets until the center looks set but still very quivery, like gelatin, when the pan is nudged, for 15 to 20 minutes. Let cool completely on a rack.
  7. Meanwhile, make the chantilly cream. Combine the cream, vanilla, brandy, and Grand Marnier in the chilled bowl and beat with an electric mixer on medium speed for 1 minute. Add the sugar and sour cream and beat on medium just until soft peaks form, about 3 minutes. Do no overbeat!!!
  8. To assemble, pile blueberries on top of each tartlet. Add a generous dollop of chantilly cream and sprinkle with fresh lavender and lemon zest.
  9. If you make the tarts ahead, lightly oil sheets of plastic wrap and press directly on the filling in each tartlet. They can be stored in the refrigerator for up to 1 day. Dress with blueberries and chantilly cream when ready to serve.

at summer's end

Andrea

Hello. My name is Andrea. I write this food blog, Bella Eats. You may remember me, or due to my long absence you may not. I’m sorry about that, truly I am. I miss this space! Life has been busy. So so so busy. I started teaching architectural design at the University of Virginia. Teaching. At a University. !!! And before that teaching officially began there was training for teaching. And in the middle of all of that I photographed the wedding of a dear friend I’ve known since the fifth grade. Fifth grade! She was such a beautiful bride, and if you’re interested in seeing some of those images please check out the AHPhoto blog.

Oh, and I started a photography business. Because I love taking pictures of people. And buildings. And food. So if you know anybody who needs somebody to take pictures of people, or buildings, or food...feel free to send them my way. I’d appreciate it so so much. And thank you, all of you, who have commented and tweeted and emailed your support. You’re the best, truly.

And yes, I am still working for an architecture firm here in Charlottesville. So...yeah. Busy.

It feels as though summer has completely passed by Bella Eats. Since June I’ve posted about cherries, blackberries, and blueberries. There have been no luscious heirloom tomatoes, no juice-laden peaches, no golden ears of corn. I even have a new trick for releasing kernels from their cob without making a complete mess of the kitchen counter and floor, and I haven’t had the opportunity to share it with you. That is sad my friends, because this trick is a good one. It will change the way you view corn entirely. Soon, I hope.

Way back in the middle of July our dear friend Kristin celebrated her birthday. She celebrated with us, and with this lime tart topped with blackberries from our garden. Blackberry season is just about over, a sign that summer is drawing to a quick close. Our bush has shed it’s bounty completely, leaving only the tiny shriveled berries that didn’t ever come to full ripeness. Our freezer is packed full of quart-size bags of the frozen fruit, our pantry shelf stocked with various forms of blackberry jam. This tart was one of the last recipes made this summer using berries fresh from the garden, and looking at these pictures already has me feeling nostalgic.

What is it about food that stirs memories stronger than those evoked by any other sense? While blackberries don't take me back to any point of my childhood, they do plop me down solidly in our backyard here in Charlottesville. For the past 4 years we've spent countless July and August evenings standing in our garden, bowls in hand, fingers stained purple, arms eaten by mosquitos, quietly and contently plucking berries one-by-one from a bush WE planted. I know that forever, no matter where we are, when I pop a freshly picked blackberry into my mouth I will be transported back to this place. I love that.

If you’re lucky you can still find pints of deep purple blackberries at your local farmers’ market, and if you do, I recommend you make this dessert before summer's end. The crust is quite perfect, nearly the consistency and flavor of a shortbread cookie. It doesn't flake and melt in your mouth like many pastry shells, but instead offers a firm vessel on which to carry a scoop of zippy lime curd. And scoop you will, because this tart never really sets up to a solid, sliceable state. Which is fine by me. The delightful combination of sweet shortbread, tart curd, and fresh blackberries had us all going back for seconds, despite our use of a spoon rather than a fork.

For the record, I am so unhappy with the spacing that this new Wordpress theme defaults too, but I just haven't had the time/energy to dig into the CSS code to fix it. And, we're working on a redesign of Bella Eats to be launched right around the two year (two years!) anniversary of this site at the end of October.  So, please bear with me and the awkward/awful spacing of the text in my recipes... Thank you.

Lime Tart with Blackberries

from bon appetit, June 2010 Ingredients for the lime curd:
  • 3 large eggs
  • 3 large egg yolks
  • 1 cup sugar
  • 3/4 cup fresh lime juice
  • 6 tbsp (3/4 stick) unsalted butter, cut into 6 pieces
for the topping:
  • (3) 6-ounce containers fresh blackberries
  • 1 tbsp blackberry jam
for the crust:
  • 1/2 cup (1 stick) unsalted butter, room temperature
  • 1/4 cup sugar
  • 1 large egg yolk
  • 1 1/4 cups all purpose flour
  • 1 large pinch of salt
Method for the lime curd:
  1. Set a fine metal strainer over a medium bowl and set aside. Whisk the eggs, egg yolks, and sugar in another medium metal bowl to blend.  Whisk in lime juice.
  2. Set bowl over large saucepan of gently simmering water (do not allow bottom of bowl to touch water). Whisk constantly until curd thickens and an instant-read thermometer inserted into curd registers 178ºF to 180ºF, about 6 minutes.  Immediately pour curd through prepared strainer set over bowl.
  3. Add butter to warm strained curd; let stand 1 minute, then whisk until blended and smooth.  Press plastic wrap directly onto surface of curd, covering completely.  Refrigerate until cold, about 4 hours.*
*Lime curd can be made up to 2 days ahead.  Keep chilled. for the crust:
  1. Using an electric mixer, beat the butter and sugar in a medium bowl until well blended, 1 to 2 minutes. Add egg yolk; beat to blend. Add flour and salt and mix on low speed until mixture resembles large peas. Using hands, knead in bowl just until dough comes together.
  2. Transfer dough to a 9-inch diameter tart pan with removable bottom. Break dough into pieces, then press dough evenly up sides and onto bottom of pan. Cover and chill 1 hour.**
  3. Preheat oven to 350ºF. Uncover crust and bake until golden brown, about 35 minutes. Cool completely in pan on rack.
**Dough can be made 1 day ahead. Keep chilled. assembly:
  1. Remove sides from tart pan and place crust on plate. Spread lime curd evenly in baked crust. Arrange blackberries in concentric circles on top of tart.
  2. Place am in small microwave-safe bowl. Heat in microwave until jam is melted, about 15 seconds. Whisk to loosen and blend, adding water by teaspoonfuls if thick. Brush jam over berries.*** (I only brushed jam over the outer ring, because I liked how they looked without the glaze.)
***Tart can be made up to 8 hours ahead. Chill uncovered.
Read More

perfect as they are

Andrea

Last month, at the very beginning of May (where did you go, sweet May?) Brian and I went strawberry picking. I’d received the email days before that shouted against a bright green backdrop “strawberries are here!”.   I anxiously await this announcement each year.  Not only does it mark Spring’s firm hold on this time in Charlottesville, it also foreshadows the other emails to come reporting the arrival of cherries(!) and peaches(!!) throughout the summer. (I'll add that, since it has taken me so very long to share this post and recipe with you, I've already received both the "cherries are ready!" and "peaches are early, and ready!" emails.  I'll try to do better this month with timely posting...)

And so Brian and I hopped in the car that Friday and drove out to the country to fill a flat with ten pounds of bright and beautiful berries. Never mind the fact that we have a garden on the side of our house that is absolutely FULL of strawberry plants. Plants that have well exceeded their raised bed boundary and tumbled into the aisles of what was once a very organized patch. Plants that, during the time we were heading towards the orchard with windows down and music blaring, were completely covered with star-shaped flowers and tiny green fruit.  But those country strawberries, they were ready RIGHT THEN, and I just couldn’t wait another week for ours to ripen.

There is something very special about moving slowly between those neat rows of plants, bending down to push emerald leaves aside, revealing the ripe and ready gems hiding in their shade.  The berries come off their stems with the most satisfying "snap!", and if popped in your mouth at that exact moment are one of the most delicious treats to ever touch your tongue.  Warmed by the sun, the fruit seems to explode in the mouth as vibrant juice seeps into every nook and cranny. It is so overwhelmingly good that you must close your eyes, tilt your face up towards the sky and slip into a little food dance of happiness.  Yes, I do that.

Once home, I set to work finding recipes for our bounty.  I thought about pie and jam and cobbler, but in the end decided that the berries were perfect just as they were.  And so I rinsed them all and placed most in a large colander in the fridge, ready for breakfast yogurt and cereal, afternoon snacks and ice cream topping.  The pint that I set aside was slated for tiny tarts, the raw berries sliced thinly and laid across a filling of cooked rhubarb within a crisp, buttery shell.

The marriage of rhubarb and strawberry is timeless, like that of chocolate and peanut butter, or coconut and lime.  One will never tire of the other, and folks will undoubtably continue to enjoy their combined company for years to come.  In these tarts, the rhubarb is cooked down in a process that resembles the making of jam, and the end result is quite similar to the classic jarred spread.  The tartness of the rhubarb is gently subdued by the sugar it is reduced with, but still punchy enough to provide nice balance to the sweet berries.

The best part of these tarts is the strawberries themselves, kept raw and firm and perfectly sweet on their own.  Find the freshest fruit possible and you can't go wrong.

Rhubarb Strawberry Tarts

from The Greyston Bakery Cookbook makes one 9-inch tart or six 4-inch tarts Ingredients
  • 1/3 cup sugar
  • 1/2 cup water
  • 1-1/4 pounds fresh rhubarb, trimmed and cut diagonally into 1/4"-thick pieces (about 5-6 cups)
  • 1 pint strawberries
  • 1 fully baked 9" Tart Pastry (see recipe below), cooled
Method
  1. In a heavy saucepan, combine the sugar and water.  Stir over medium-low heat until the sugar dissolves. Add the rhubarb, increase the heat, and bring to a boil.  Reduce the heat to medium-low, cover, and simmer for 5 minutes, or until the rhubarb is just beginning to soften.  Remove the pan from the heat.  Let stand, covered, for 10 minutes, or until the rhubarb is tender.
  2. Set a mesh strainer over a medium bowl and drain the rhubarb, reserving the liquid.  Allow the rhubarb to cool completely.  In a small saucepan, simmer the reserved liquid over medium-low heat for 5 minutes, or until it is reduced to a thick syrup.  Set the syrup aside and allow it to cool completely.
  3. Meanwhile, wash and hull the strawberries.  Thinly slice the strawberries lengthwise.
  4. Spread the cooled rhubarb evenly over the bottom of the tart shell.  Arrange the strawberry slices in concentric circles over the rhubarb filling, covering it completely.  Brush or spoon the cooled syrup over the top of the strawberries.  Chill before serving.

Tart Pastry

Ingredients
  • 1-1/4 cups all-purpose flour
  • 2 tbsp sugar
  • 1/4 tsp salt
  • 7 tbsp unsalted butter, cut into very small pieces and chilled
  • 1-3 tbsp ice water, as needed
Method
  1. In a bowl, whisk together the flour, sugar, and salt to blend thoroughly.  Using a pastry blender, metal pastry scraper, two knives or your fingers, cut or rub the butter in the dry ingredients until the mixture resembles a coarse meal.
  2. Using a fork, stir in the water, 1 tbsp at a time, adding just enough for the dough to hold together without becoming wet.  Gather the dough into a ball and then flatten it into a disk.  Wrap the disk of dough in plastic wrap and chill for 1 hour.
  3. Remove the dough from the refrigerator.  Using a rolling pin on a lightly floured board, roll the dough to form a rough circle about 1/4" thick.  Carefully transfer the dough to a 9" fluted tart pan (or six 4" pans) with a removable bottom.  Press the dough lightly but firmly into the edges of the pan, allowing the excess dough to hang over the edges of the pan.  Roll the rolling pin over the top of the pan to trim the excess dough from the pan rim.  Pierce the bottom of the dough several times with the tines of a fork.  Chill for at least 30 minutes before baking.
  4. Position a rack in the center of the oven and preheat the oven to 400*F.  Line the chilled shell with foil or parchment and fill with pie weights, dried beans, or raw rice.
  5. Bake the shell for 12 minutes, or until the pastry is set and golden.  Carefully remove the foil or parchment and weights and continue to bake the shell another 10 to 15 minutes (a little less if you use the smaller pans), or until the pastry is golden brown.  If the edges start to brown too much, cover them with strips of foil or piecrust shields.  Cool on a rack.
Read More

5 weeks, 5 pies, 5 pounds

Andrea

When we moved to Virginia 4+ years ago, my momma told Brian and I about an incredible pie experience she’d had years prior at a little restaurant in Staunton, about 45 minutes from Charlottesville. She waxed poetic about an apple pie better than any she’d ever had, including her grandmother’s recipe which had previously held first place on her pie-ranking list. We were encouraged to drive over the mountain chain separating us from Mrs. Rowe’s Restaurant and Bakery one Saturday for a special treat, to indulge in one, or maybe even two slices of a pie that still had a mouth-watering affect on her all these years later. CC Pie-10 The restaurant and its legendary pie quickly slipped my mind as we moved into a house and started new jobs, busying ourselves with life in Charlottesville and the many culinary delights we have in this little city. I hadn’t thought of my momma’s story in 4 years, until I attended the C’ville Pie Fest and learned of Mollie Cox Bryan and the cookbook she’d written about Mrs. Rowe and her pies. I didn’t have the opportunity to meet Mollie as I was busy photographing and she was busy judging, but we did get in contact with each other afterwards via Twitter and she generously offered to send me a copy of her book to aid me in the kitchen during Bella Eats Pie Month. CC Pie-20 The cookbook arrived on my doorstep a few days later, and I was delighted by what I found as I immediately began flipping through its pages. Mrs. Rowe’s Little Book of Southern Pies is lovely with a simple, intuitive layout and beautiful photos of many of the featured pies sprinkled throughout. Mollie starts by introducing her reader to Mildred Rowe and the Staunton restaurant, describing the space and the woman behind it with clarity and detail that only someone who has spent much time there could. The reader is then taken through one section detailing pie-making equipment and another describing techniques for various crusts and toppings. While the Plain Pie Pastry and Vinegar Pie Crust recipes seem simple enough, Mollie points out that the light touch of an experienced baker can take years to master. I plan to continue practicing. CC pie merge 1 Despite its petite size, Mrs. Rowe’s Little Book of Southern Pies is packed with useful tips and 65 recipes, some straight from Mrs. Rowe’s Restaurant and Bakery and others from journals found during Mollie’s research. Restaurant favorites such as the Original Coconut Cream Pie, Chocolate Meringue Pie, Peanut Butter Pie and French Apple Pie are all present along with some classic Southern varieties like Shoofly Pie, Lemon Chess Pie and Blackberry Pie.  Each recipe is accompanied by a small tidbit of history, a direct quote from a member of the Mrs. Rowe's team or a memory from a loyal customer.  The book is personal; peppered with heartfelt writing and recipes that are sure to remind you of a special occasion in your life, when a certain pie was served to a table full of your closest family or friends. CC Pie-1 I chose to tackle the Original Coconut Cream Pie recipe rather than the apple variety my momma had raved about. As the best-selling pie at Mrs. Rowe's Restaurant and Bakery it seemed to be a safe bet.  And, I really wanted to try my hand at meringue, a baking challenge I hadn’t yet subjected myself to. I found the recipe to be fairly easy to follow, although previous experience baking cream pies might have been helpful to me. Where the recipe called for a mixture of milk, sugar, cornstarch and egg yolks to be heated and stirred until "very thick", about 4 minutes, I had no frame of reference in mind for what that consistency should be.  Having reached 6 minutes with a pudding-like consistency, I pulled the mixture from the heat thinking it would thicken up more when baked.  No such luck.  Upon slicing, the cream filling oozed from the center of the slice into a pool on the plate.  Clearly my idea of "very thick" was not thick enough.  The meringue, however, was absolutely perfect. CC Pie-2

Some Notes on Cream Pies and Meringue Tops

The runny nature of my pie was most certainly the result of my own lack of experience in cream pie baking and not the fault of the recipe itself. Here are my notes for the next time I tackle a cream pie.
Many cream pie recipes call for the use of a double boiler when heating and thickening the cream mixture.  A double boiler is basically two saucepans that fit together, allowing water to boil in the larger pan with your cream mixture heated in the smaller pan set just above the boiling water.  I realized after this latest pie-making adventure that my "double boiler" is not really a double boiler in the traditional sense.   I think it hindered my process rather than helped it, and believe I would have been better off setting a large stainless steel bowl containing my cream mixture over a large saucepan containing boiling water.  If you're shopping for a double boiler, find one that looks like this, rather than like this.  Or, just set a stainless steel bowl over a saucepan. When heating and thickening the cream mixture, the texture is more important than the time it takes to get to that texture.  As I learned, all stove tops and double boilers are different, so it could take more or less time to reach the desired consistency depending on your situation.  You're going for a thick, custard-like consistency.  It shouldn't be runny at all, should fall from a spoon with a thick "plop" rather than run off of the spoon with any resemblance to liquid. Don't let the milk actually come to a boil as you're heating it, you don't want it to scald. Your meringue will take more or less time to come together depending on your environment.  Mine took about 10 minutes of consistent beating with a stand mixer (whisk attachment), on a cool, rainy day. When making your meringue be sure to add your sugar slowly, as it is important for all of the sugar to dissolve into the egg whites between each addition. Meringues are subject to "weeping", when the sugar solution comes out of the meringue in little droplets.  This happened with mine, and after a little research in The Joy of Cooking I discovered that it is more likely for a meringue to weep on a humid day.  It still tasted delicious, there were just small droplets of liquid sugar sprinkled across the surface of the meringue, and it wasn't as dry to the touch as you would expect it to be. Be sure not to overfill your pie crust with your cream filling.  Leave at least 1/4-inch of the crust exposed to be sure your filling doesn't overflow.  Also, when you add your meringue to the top of the filling it can cause overflow, so it is good to have a little bit of wiggle room as you design your topping. Meringue can be shaped with a spatula in any way you wish.  Smooth it over, swirl it around, form fancy little peaks.  Let your inner artist shine! Seal the edges of your meringue by wetting your finger with cold water and running it over the rim of your crust.  Press the meringue down into your crust to help prevent weeping and potential filling overflow.
CC Pie-5

Original Coconut Cream Pie

from Mrs. Rowe's Little Book of Southern Pies by Mollie Cox Bryan, pg 64 I've written the recipe as it appears in the cookbook, but see my notes above to learn from my mistakes. makes one 9-inch pie Ingredients:
  • 1/2 recipe plain or vinegar pie crust (I used this one because I had it in my freezer already), prebaked
  • 3 large egg yolks (be sure to reserve the whites for the meringue, below)
  • 1 cup sugar
  • 1/4 cup cornstarch
  • 1/4 to 1/2 cup water
  • 3 cups whole milk
  • 1 cup sweetened flaked coconut
  • 1 tbsp unsalted butter
  • 2 tsp vanilla extract
  • 1 recipe Mrs. Rowe's Meringue (below)
Method:
  1. Preheat the oven to 325*.
  2. Stir together the egg yolks, sugar, cornstarch and just enough of the water to make a smooth paste.
  3. Heat the milk in a double boiler set over simmering water. (Or, place a medium-size stainless steel or glass bowl into a large saucepan filled with a couple of inches of simmering water.)  When the milk begins to steam gradually whisk in the egg mixture.  Cook, stirring occasionally, until very thick, about 4 minutes.  Remove from the heat and stir in 3/4 cup of the coconut, the butter and the vanilla.  Set aside.
  4. Make your meringue, see below.
  5. Pour the filling into the prebaked crust and top with the meringue.  Seal the edges well by wetting your finger with cold water and running it along the edge of the crust, pressing the meringue into the crust as you go.  Sprinkle the remaining 1/4 cup coconut over the meringue.
  6. Bake for about 30 minutes, until the meringue is golden brown and its firm to the careful touch (its easy to poke a hole in the meringue).  Cool on a wire rack for at least 2 hours before slicing.

Mrs. Rowe's Meringue

makes enough to cover one 9-inch pie Ingredients:
  • 4 large egg whites, at room temperature
  • 1/4 tsp cream of tartar
  • 3 tbsp granulated sugar
Method:
  1. Combine the egg whites and cream of tartar in a chilled bowl and beat with an electric mixer on slow speed.  Gradually increase the speed as the egg whites thicken, eventually landing on medium speed.  Beat until soft peaks form.  Add the sugar 1 tbsp at a time, beating for about a minute after each addition.  Beat until stiff peaks form, but not so long that the peaks become dry.  The meringue is now ready to pile lightly over the pie.
CC Pie-7 And that concludes Bella Eats Pie Month!  5 weeks, 5 varieties, and 5 pounds later, I've learned so much and hope you have too.  Please write and tell me about any of these or other pie recipes that you try out this holiday season.  I'd love to hear from you. While I'm ready to take a short break from pie, as are all of our friends and co-workers, I look forward to continuing my experimentation and sharing more pie recipes with you in the future.  Here are a few more on my list to try: Peanut Butter Banana Cream Pie Key Lime Pie Bourbon Peach Hand Pies Lemon Meringue Pie Pear Cranberry Pie
Read More

the good stuff

Andrea

pie logo pecan As I flew over Charlottesville last Thursday en route to Florida I took note of the fiery colors starting to present themselves in the trees below.  The deep orange and bright yellow hues stood out in the dark green forest like fireworks in a midnight sky.  Autumnal thoughts quickly left my mind as I jetted towards a weekend to be spent with family and friends in weather that required sundresses and sandals rather than corduroy pants and scarves. Outdoor dining options were declined in favor of cool indoor air conditioning as we all sipped punch made from honeydew, mint and ginger ale. The summertime frame of mind embedded itself so deeply in my subconscious that I boarded the flight home on Sunday in a tank top and flip flops, not thinking about the sub-50-degree air I would be greeted with as I deplaned at CHO. IMG_8386 Despite the 85-degree weather and ever-present green of my home state, during my visit last weekend there were a couple of clues that indicated the current season. The stores there all have the same picked-over Halloween costume aisles and sections devoted to Thanksgiving decorations as we have in Virginia. Restaurant menus show some seasonal specials featuring sweet potatoes and cranberries, and the slight drop in nighttime temperature has Floridians pulling out their lightweight fleece hoodies to protect themselves from the “cold”.   The light has changed, lower and more golden that it was when I last visited a few months ago.  But the indicator that hit home most with me, that brought back a flood of childhood memories of Autumn in Florida, was the giant box of full-size candy bars I noticed stashed close to the front door at my daddy’s house. IMG_8372 Growing up in Florida, Autumn had a very different feel than it does now that I live in Virginia. In my life now, Autumn means festivals and apple picking, changing leaves and layered clothing. We attend sheepdog trials and buy pumpkins from local farmers, plan parties with locally made hard cider and hand-dipped caramel apples. In Florida, in my youth, I remember the night air turning a little bit cooler and being very, very excited if I spotted a tree changing from green to a pale yellow-brown as I drove past on the interstate. I'd insist on wearing a sweater for Thanksgiving dinner no matter the temperature outside and the fact that I may sweat through it, and longed for a day when I could justify the purchase of a scarf. And then, of course, there was Halloween.  For me, Autumn in Florida was all about Halloween. IMG_8426 The party planning started in September.  Each year my parents and I (well, my parents, really) hosted a huge Halloween bash at our house, complete with haunted cemetery in the yard, costume contest, bobbing for apples or, when my friends and I all had braces, eating donuts hung from the rafters of our back porch with hands tied behind our backs.  Evenings and weekends prior to the big day were spent with my father in the garage, drawing tombstone shapes on giant pieces of foam and cutting them out with a hot knife, the smell of melting styrofoam permeating the space for weeks.  Daddy is a perfectionist, so the paint job those tombstones and the corresponding cemetery sign that arched high over the gate to our back yard received was perfect.  That was one scary cemetery my friends had to walk through to get to the fun and games. IMG_8389 Come Halloween night, a few days after our party, my father gave, and still gives, full-size candy bars out to trick-or-treaters. Full-size. All of the neighborhood kids know about my dad and the top-notch treats he gives out, which means he buys a lot of candy bars. I enjoyed trick-or-treating as a child, but what I enjoyed even more as a young adult was staying home with Daddy, handing out those candy bars to the costumed youth and hearing the excited tone of their voices as they whispered to each other "see! I told you he gave out the good stuff!" I'd look over at Daddy, who would grin and chuckle and comment on all of their costumes as he dropped bars into their buckets, and smile with pride that I had the cool dad who gave out the good stuff. IMG_8444 That's my daddy, generous to a fault, always giving out the good stuff.  Whether it be full-size candy bars to strangers on Halloween, time on the telephone working through digital camera and photography questions or unbelievably kind gifts, he's always striving to put a smile on the faces of those surrounding him.  At this time of year, especially, I am nostalgic for my youth and the time I spent with him each fall, wishing I could fold his tradition of handing out full-size candy bars into my life now and regretting that we live in a neighborhood that trick-or-treaters don't visit.  So instead, I made Daddy's favorite kind of pie and thought ahead to Thanksgiving, when we'll sit around the same table with Brian and all of my stepfamily and enjoy an Autumn meal together. IMG_8519 I tried out two different pecan pie recipes this week along with two different crusts.  The first is more of an old-fashioned pecan pie, the filling made with dark brown sugar, butter, egg and a splash of bourbon with the pecan halves kept intact.  The second pie filling consisted of a little bit of dark brown sugar paired with a lot more corn syrup, butterscotch chips, eggs and chopped pecans.  They were both delicious, although there was a definite favorite amongst those surveyed at my office and in our home.  I am hesitant to tell you which it was, as both recipes are great and I really recommend that you choose your favorite based on your own tastes. pecan pie merge 1 Devoid of corn syrup, this pie has the dense texture that I associate with the old-fashioned pecan pie.  It is sweet, being mostly sugar, but the bourbon adds a nice mild kick to the bite and a pleasant aftertaste that cuts the sweetness quite successfully.

Spirited Pecan Pie

adapted from bon appetit, october 2005 Ingredients:
  • one 9-inch pie crust, raw (see below for joy's no-roll pie crust that I used, or you can use any recipe that you are comfortable with)
  • 2 cups (packed) dark brown sugar
  • 4 large eggs
  • 1/4 cup (1/2 stick) unsalted butter, melted
  • 1 tbsp bourbon
  • 2 tsp vanilla extract
  • 1/4 tsp ground cinnamon
  • 2 cups pecan halves
Method:
  1. Preheat oven to 350*.
  2. Mix sugar, eggs, butter, bourbon, vanilla and cinnamon together in a bowl.  Stir in the pecan halves.  Pour filling into dough-lined dish.
  3. Bake pie until filling is slightly puffed and set in center, covering crust edges with foil if browning too quickly, about 40 minutes.
  4. Let pie cool completely before slicing.
pecan pie merge 2 With corn syrup used as the main sweetener and the addition of butterscotch chips, this pie is ultra-sweet.  The filling is silkier than the pie above, and the chopped pecans make each bite more consistent in texture.  I loved the addition of butterscotch in this pie, and know my daddy will too as he is a big fan of those little golden chips.

Butterscotch Pecan Pie

from Marijean of STL Working Mom.  This pie received rave reviews at the C'ville Pie Fest - the inspiration for Bella Eats Pie Month - so I just had to try it. Ingredients:
  • one partially pre-baked 9-inch flakey pie crust (I used the p-p-p perfect pie crust below, but you can use whatever recipe you are comfortable with)
  • 1 cup light corn syrup
  • 1/2 cup firmly packed dark brown sugar
  • 1/2 stick unsalted butter, cut into pieces
  • 1 cup butterscotch chips
  • pinch of salt
  • 3 large eggs
  • 1 egg yolk
  • 1-1/2 tsp vanilla extract
  • 2 cups chopped pecans
Method:
  1. Preheat your oven to 350*.
  2. In a medium saucepan on the stove top, warm the corn syrup, sugar, and butter over low heat until incorporated.  Remove from heat and stir in butterscotch chips.  Add pinch of salt and set aside for 5 minutes, stirring occasionally.
  3. In another bowl, whisk the eggs and egg yolk until frothy.  Add vanilla and whisk again.  Add your butterscotch mixture to the eggs and whisk until well incorporated.  Add the chopped pecans, stirring until all are coated with butterscotch mixture.
  4. Pour filling into partially-baked pie crust.  Bake in lower third of oven for 40 minutes.
  5. Allow to cool completely before cutting.
IMG_8495 Joy is right - this pie crust is easy!  If you're wanting to make a crust without much notice, or are intimidated by crusts that require rolling, this recipe is for you.  The final texture was more crumbly than flakey and reminded me of the consistency of a shortbread cookie.  But it held together nicely when sliced and has a pleasant, mild flavor.

No-Roll Pie Crust

from joy the baker Ingredients:
  • 1-1/2 cups all purpose flour
  • 3/4 tsp salt
  • 2 tbsp sugar
  • 1/8 tsp baking powder
  • 1/4 cup (4 tbsp) butter that has been grated on a cheese grater
  • 1 tbsp cream cheese, at room temperature
  • 1/4 cup vegetable oil
  • 2 tbsp cold milk
Method:
  1. First, grate your butter on a cheese grater and place in the freezer.
  2. In a medium-sized bowl combine flour, salt, sugar and baking powder.
  3. Add frozen, grated butter and cream cheese.  With your fingers, work the cream cheese and butter into the flour mixture, breaking up the butter and cream cheese so that the mixture resembles course breadcrumbs with some pea-sized bits of butter.
  4. Combine the milk and oil and whisk together.  Add all at once to the flour/butter mixture and mix together gently with a fork, until all flour has been introduced to the liquid and the dough starts to come together in small clumps.  It does not need to come together into a ball.
  5. Dump the dough mixture into your pie plate.  With your fingers, press the dough against the bottom and up the sides of the dish.  Try to get the dough as even as possible, but don't worry about finger indentations.
  6. Place the prepared crust in the freezer while you preheat your oven and prepare your filling.  If you're going to pre-bake the crust, heat the oven to 350*and line the chilled pie crust with foil, weigh it down with pie weights or dried beans and bake for 10 minutes.  Remove the foil and bake until golden brown, 5-10 minutes.
IMG_8367 Ok, so this crust IS pretty perfect.  It is an all-shortening crust, which I've never made before, and I was incredibly impressed with the flakey result.  The flavor was delicious (although not as good as all butter, in my opinion) and the texture couldn't be beat .  One warning, it shrinks with baking, as shortening literally "shortens" the gluten strands in the dough even more so than butter.  Before pre-baking, the crust pictured below reached the top of my pie pan. So, be sure not to fill the crust as much as you normally would if you don't pre-bake.

P-P-P Perfect Pie Crust

from the pioneer woman Ingredients:
  • 1-1/2 cups vegetable shortening (non-hydrogenated)
  • 3 cups all-purpose flour
  • 1 egg
  • 5 tbsp cold water
  • 1 tbsp white vinegar
  • 1 tsp salt
Method:
  1. In a large bowl, gradually work the shortening into the flour with a pastry cutter (or 2 butter knives, or your fingers) until the mixture resembles a course breadcrumbs, about 3-4 minutes.
  2. In a small bowl, beat the egg with a fork then add it to the shortening mixture.
  3. Mix together your water and vinegar and salt, then add to the shortening mixture.
  4. Gently stir the ingredients together with a fork until they are well incorporated.
  5. Divide dough into two equal balls (I differed from the recipe here - it called for three balls but they seemed to be too small for a pie crust to me).  Place each ball in a ziplock bag and use a rolling pin to flatten them each into a 1/2-inch thick disk.  Seal the bags and place them in the freezer until you need them (for at least 30 minutes but up to 3 months).
  6. When you are ready to use the dough to make a crust, remove from the freezer and allow to thaw for 15 minutes.  On a floured surface, roll out the dough starting from the center of the disk and working your way out, rotating the disk as you go to keep it round in shape.  Sprinkle dough with flour if it is sticking to your rolling pin. (I did this on a sheet of parchment paper to make transfer to the pie dish very easy). You should have a circle of dough 13-inches in diameter for a 9-inch pie pan.
  7. Lift the dough carefully from the counter to place in the pie pan.  (Or, if you've used parchment paper, turn your pie pan upside down on top of the dough, and carefully flip the dish and dough so that the dough is on top of and settles into the dish.  Peel off the parchment paper.)  Press the dough into the corners of the pan and pinch and press the edge.
  8. Set your oven to 350*.  Prick the dough bottom with a fork in several places for ventilation.  Line your dough in your pan with  aluminum foil, then place pie weights or dried beans on top of the foil.  Bake for 10 minutes, then remove the pie weights and the foil and bake for 5 minutes more if only partially pre-baking.  To fully pre-bake, bake without foil until the crust is a golden brown.  Remove from oven and allow to cool completely before filling.
IMG_8375 I've decided to extend Bella Eats Pie Month into November for one more week, so be sure to visit next Thursday for the last installment, Coconut Cream Pie, along with a review of Mrs. Rowe's Little Book of Southern Pies by Mollie Cox Bryan. And, I'll have a special Halloween post for you tonight or tomorrow morning, so be sure to tune back in!
Read More

a winner, indeed

Andrea

pie logo apple Our car winds its way up the narrow gravel road to the top of Carter Mountain. The windows are cracked, and the almost-too-cold October air slips in and lifts my hair from my face. The early afternoon light is diffused by retreating rain clouds that lend the sky a lovely texture rather than pose any real threat of storms. We bump along the pitted drive, ignoring the dust billowing up from beneath the tires of the [very slow] car full of tourists in front of us. We have no schedule, no place to be, just plans for picking bags full of apples and enjoying this first rain-free afternoon in days. cheddar apple pie-6-edit Once parked we make our way through the crowd towards the renovated barn, dodging bundled-up children being pulled in bright red Radio Flyer wagons by slightly-frazzled parents. The smell of freshly baked apple pie and apple cider doughnuts fills the air as we find the ‘pick-your-own’ information kiosk, grab a bag, ask about availability and set off on our hunt for sweet and crisp Fuji apples. We continue our journey towards the top of the mountain, this time on foot, huffing and puffing just a little as I am reminded again of why I should wear sturdier shoes on these treks. Fifteen minutes later we have found rows full of our target. The bright pink globes dance in the wind and beg to be picked, and I am thankful again that Brian is tall and can reach the otherwise unattainable perfect specimens near the tops of the trees. cheddar apple merge 1 We fill our first bag, saving the second for a bin full of bright green Granny Smiths calling our name back at the barn. The pick-your-own trees once dripping with that variety were stripped the previous two weekends during the Carter Mountain Apple Festival, the bounty already baked into pies and crisps across the city of Charlottesville. Once we’ve gathered more apples than we probably need, stashed a half-gallon of apple cider under an arm and paid for our haul, we make our way back to the car already planning our next trip to the orchard in two weeks, when Pink Ladies will be ripe for picking. cheddar apple pie-10 I knew from the first moment that Brian and I started talking about Bella Eats Pie Month that I would be making an apple pie. Not because of the time of year, or its classic role on the Thanksgiving dinner menu, or the fact that we have a lovely orchard located a mere 15 minutes from our house with trees loaded down with apples. No, I knew that apple pie would be on the agenda because it is my husband’s number one, all-time favorite, could eat it every day, dessert. If I am the director of our kitchen and weekly menus (and truly, I don’t hold all the control), he is the marketing agent for the apple pie, advocating for its place at our table as soon as the first golden light of fall spills through our windows and across the dining room floor. cheddar apple merge 3 I really wanted to try something new (to us, at least) for Pie Month, and so started to look into apple pie variations. Initially Brian balked, for even though he is a fan of the apple cranberry pie I make every year, he is truly a classicist when it comes to his favorite dishes and was not keen on the idea of my shaking things up. Until a reader, Hannah, was sweet enough to send me her grandmother’s recipe for Cheddar Apple Pie. Cheddar? Apples? Yum! I’m embarrassed to say that we’d never even heard of such a pie in our household, not even the Wisconsin tradition of layering a slice of cheddar across a warm slice of freshly-baked apple pie. The idea appealed to both of us, especially Brian’s not-so-sweet tooth, and so Cheddar Apple Pie was penciled into the agenda. cheddar apple pie-14 A bit more research later, and I discovered that I’d overlooked the Cheddar-Crusted Apple Pie in the September 2009 issue of Gourmet. Given the recent, heart-breaking turn of events for one of the most beloved food publications out there, I decided to give that recipe a try, having never been disappointed with a recipe from Gourmet and wanting to mourn its untimely demise in my own way. cheddar apple merge 4 As with most recipes I've tried from within the pages of Gourmet, this one came together beautifully.  Once the dough softened up a bit and stopped giving me a killer upper-body workout, it was a dream to work with.  No tears or splits or crumbles except for at the edges.  The slight sweetness of the filling was perfectly balanced by the savory tone of the crust, which flaked just as it was meant to and melted away on the tongue.  The cheddar added a nice punch that left me wishing I had baked off the scraps leftover after trimming the pie's edge, imagining that pairing those crispy strips with slices of fresh apple would have provided a perfect afternoon snack. The not-too-sweet nature of this pie was the perfect follow-up to the rich chocolate + caramel pies I was producing last week.  If you have loved ones who aren't big dessert fans, who just don't have much of a sweet tooth, this pie is the answer to your "what shall I make" questions.  Even Brian, who has been known to pass up cake / cookies / pie / ice cream in favor of an extra helping of meat or mashed potatoes, consumed multiple pieces of this pie in a day.  And then did it again the next.  This pie is a winner, indeed. cheddar apple pie-17 I had an additional apple pie planned for the week, a classic version shared by Joy, but a busy weekend and even busier evenings prevented its assembly in our kitchen. Luckily this first pie came out wonderfully, other than a few of my own mistakes that I've noted below the recipe. And, given Brian’s obsession and the ripening of Pink Ladies on the trees at Carter Mountain Orchard in a short amount of time, I feel certain that I will be making Joy's pie in the near future and will be sure to share it with you all. If you're in the mood for more of an apple crisp or crumble, try out Nana's recipe.  You won't be disappointed. cheddar apple pie-18 Cheddar-Crusted Apple Pie from Gourmet, September 2009 (sniff, sniff) serves 6 to 8 Pastry Ingredients:
  • 2-1/2 cups all-purpose flour
  • 1/2 tsp salt
  • 1/2 pound extra-sharp cheddar (preferably white), coarsely-grated (2-1/2 cups)
  • 1 stick cold, unsalted butter, cut into 1/2-inch pieces
  • 1/4 cup cold vegetable shortening, cut into 1/2-inch pieces (I had no shortening, so used more butter instead)
  • 6 to 8 tbsp ice water
  • 1 tbsp milk (or 1 egg whisked with 1 tbsp water), for wash
Filling Ingredients:
  • 3 pounds of apples (I used Fuji and Granny Smith, but will substitute either Pink Ladies or more Granny Smiths for the Fuji next time), about 6 medium apples
  • 2/3 cup sugar
  • 3 tbsp all-purpose flour
  • 1 tbsp fresh lemon juice
  • 1/4 tsp salt
  • 1 tbsp cold unsalted butter, cut into bits
For the Pastry Dough:
  1. Stir together flour, salt and cheese in a large bowl.  Add butter and shortening and blend with your fingertips or a pastry blender until the mixture resembles course breadcrumbs and the biggest pieces of butter are no larger than a pea.
  2. Drizzle 6 tbsp of the cold water over the mixture and stir with a fork until incorporated.  Squeeze a lump of the dough between your fingers.  If it holds together it is ready, if it falls apart it needs more water.  Add a tablespoon at a time, testing after each addition until the consistency is right.  Do not overwork or your pastry will be tough.
  3. Turn out dough onto floured work surface and divide in two.  Shape each half into a smooth 5-inch diameter disk and wrap in plastic.  Refrigerate for at least one hour, or up to two days.  It can be frozen at this stage for up to three months.
Assemble the Pie:
  1. Put a foil-lined baking sheet in the middle of the oven and preheat oven to 450*.
  2. Peel and core the apples.  Slice into 1/4-inch thick pieces.  (see note below)  Toss apples with lemon juice, flour, sugar and salt until evenly coated.
  3. Roll out one disk of dough on a lightly floured surface into a 13-inch round. (see note below)  Fit into a 9-inch pie plate (mine is glass) leaving a 1/2-inch overhang.  Roll out the second disk of dough into an 11-inch round.
  4. Transfer filling to the shell.  Dot with butter (see note below), then cover with the second pastry round.  Trim edges, leaving a 1/2-inch overhang.  Press edges together to seal then fold under.  Crimp edges as desired.  Brush top of crust with milk (or egg, my preferred wash) and sprinkle with course sugar.  Cut vent 5 vent holes (1-inch long).
  5. Bake on hot baking sheet for 20 minutes.  Reduce heat to 375* and bake until crust is golden brown and filling is bubbling, 30-40 minutes more.  (I baked mine for full 40, but should have removed it at 30 as the filling and bottom crust were over-done).
  6. Cool to warm or room temperature, 2 to 3 hours.
cheddar apple pie-20 Notes:
After removing the dough from the refrigerator, let it sit for 5 minutes or so to soften up before rolling it out.  And be ready for a workout!  The cheese binds this dough together very nicely, which makes it a bit tough to work until you get it pretty thin. The Granny Smith apples held together nicely, but the Fuji apples were reduced to the consistency of a chunky applesauce.  If you're going to use two varieties of apples with different textures, be sure to compensate by slicing the softer apples thicker than the others. Do not bake this pie on the bottom rack, as I did with my Italian Plum Pie.  I'm not sure if it was the addition of cheese in the crust, or the fact that the apples weren't as juicy as the plums (and therefore less likely to soften the crust), but after baking this pie on the bottom rack the bottom crust was overdone, even with less baking time.  It tasted just fine, but was tough to cut through with only your fork.
cheddar apple pie-22

Local

The Virginia Chutney Festival is this weekend (the 24th) in Sperryville!  Go check it out and report back to me since I won't be in town to participate in the festivities! WriterHouse in Charlottesville is hosting a morning seminar this Saturday (the 24th) with Molly Cox Bryan (author of Mrs. Rowe's Little Book of Southern Pies and Mrs. Rowe's Restaurant Cookbook) titled "Writing About Food - Turning Appetite Into Art and Articles".  I SO wish I were going to be in town for this!!!  Again, GO and report back to me! And last, I've just learned of a special dinner being held at Maya in Charlottesville on November 9th that will feature ALL local food!  Participants include two of my City Market favorites, Double H Farm and Roundabout Farm, along with local wine.  There are other exciting details, but unfortunately I haven't been able to find any information online.  Call 434.979.6292 for additional details and reservations.  I'll post more as I learn more, but I can assure you that Brian and I (along with a couple other foodie friends) will be there!
Read More

perfect on its own

Andrea

pie logo mousse About a year ago, my momma started talking to me about a chocolate mousse pie. Or, more specifically, a chocolate mousse pie whose mousse was so delectable that she and my stepfather decided to eliminate the crust, and therefore the element that made the dessert a “pie”, altogether. They’d served the mousse at a few dinner gatherings and even to my stepbrother (who is notoriously picky and known to complain about most dishes that come from our parents’ kitchen) with much success. “You’ve GOT to make it sweetie”, she’d say, “Its just soooooo yummy!” mousse pie-1 I put it off because, honestly, I’m not a big chocolate mousse fan. Give me a slice of moist chocolate cake with raspberry filling that oozes from its interior, or a rich chocolate cheesecake so dense that your tongue has to work to break it down in your mouth, even a petite chocolate cupcake with berry-flavored buttercream. But chocolate mousse? Eh. I can take it or leave it. When it comes to dessert, I like each bite to be substantial. None of this “melt in your mouth” or “light as air” stuff for me. I even like my ice cream extra thick so that each spoonful lingers for seconds longer than the regular stuff. mousse pie-4 But my momma, she’s stubborn. She was determined that I would like THIS chocolate mousse and so added it to the dessert menu for our Christmas meal last year. I’m willing to try anything, but honestly, I was looking forward to the coconut mango white chocolate bread pudding WAY more than the fluffy, mocha-hued blob resting in the refrigerator. The time for tasting came and I dropped a small serving of mousse next to my [much larger] mound of bread pudding. I dipped my spoon in and brought the chocolate fluff to my mouth. My eyes closed as my tongue deciphered the flavors resting on it - the rich dark chocolate mingling with the tang of buttermilk, all lightened to the silkiest texture by the homemade whipped cream folded in. I did a little shimmy in my seat, the classic food dance that lets everyone present know that I am very, very happy. And then I took another bite. And another. I was completely, totally, hopelessly hooked. mousse pie-5 When the C’ville Pie Fest was brought to my attention a couple of weeks ago I, of course, emailed my Momma for her opinion on what I should make. She, of course, said “Chocolate Mousse Pie!” (its her standard answer for most of my “what should I make for dessert” questions...). I didn’t think it was such a good idea, since I wasn’t sure how the mousse would hold up outside of the refrigerator for multiple hours. And room-temperature mousse pie is messy - its not the kind of pie that wins you big points in the “appearance after sliced” category. I did, however, add her suggestion to my list for Bella Eats Pie month knowing that I would not only be sharing a worthy recipe with all of you, my readers, but I would also be pleasing my Momma.  And who doesn't love to please their momma? mousse pie-6 There's something you should know about me...I'm a tweaker.  I like to experiment with recipes, especially baked goods, to make them my own.  My momma sent me the chocolate mousse recipe, which my stepfather had modified slightly from Emeril, and I immediately started thinking of ways to improve it.  I debated various crusts and other layers that I could add to the pie, resting finally on an idea inspired by Helen of Tartelette...salted caramel mousse.  The mere thought of the rich dark chocolate paired with salted caramel swirling around my tongue actually evoked the food dance from me way before sugar, cream or butter ever came into contact on my stovetop.  Very excited by my own brilliance, I called my momma to brag about the sure-to-be-delectable pie that I'd be making that weekend.  She gasped and ooh'd and aww'd appropriately, then turned to my stepfather to tell him of my plans.  "Why", he asked, "would she want to do that?  The mousse is perfect on its own!" mousse pie-8 
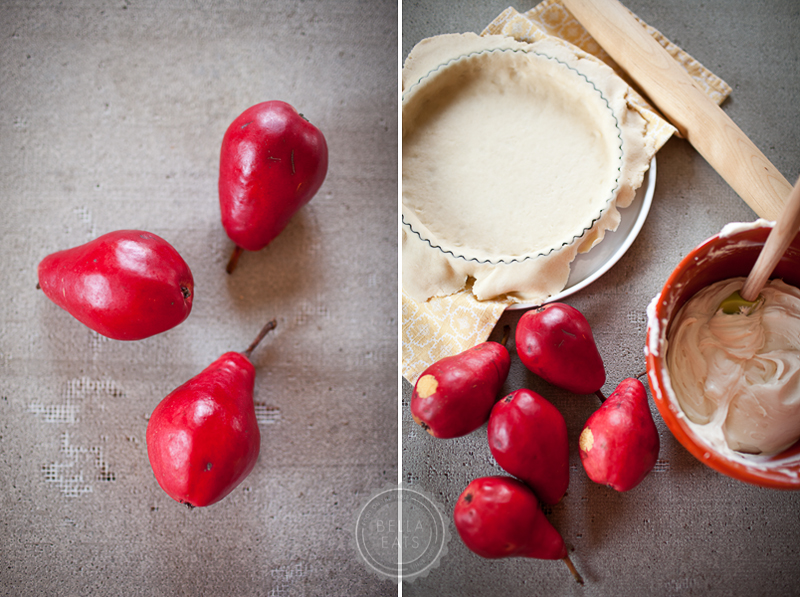
Determined to prove him wrong, I set to work last Sunday morning on my Chocolate and Salted Caramel Mousse Pie (pictured in photos above).  I tweaked the chocolate mousse (from Emeril) slightly, but made the crust as he specified.  I made Helen's Salted Butter Caramel, but instead of folding a mousse base into it after it cooled I folded in homemade whipped cream, creating more of a salted caramel cream that I then layered over the chocolate mousse base.  It was all pretty loose, especially the caramel layer, so I stuck the whole pie in the freezer to let it firm up until we were ready to serve it to our evening guests. There was much anticipation for dessert, especially from me since I had already given my pie a food dance without ever tasting it.  We let it sit for a bit to soften then sunk the server deep into the pie's center, watching as it pulled the mousse toward the outer rim of the dish.  Normal-sized slices were served, small enough that ten people could be served from one 9" pie.  We all dug in and let out happy exclamations for each of the first three to four bites, and then started to slow down.  Drastically.  Because this pie was RICH.  So rich that even I, queen of heavy, decadent desserts, couldn't finish a whole slice. mousse merge 2 And so I moved on to plan B.  I had this feeling that because both the chocolate and caramel layers were light and mousse-like, they oozed together in your mouth without maintaining their own identities and created a bite that was overwhelmingly rich.  After some consultation with Brian and my Momma, I decided to try a pure caramel layer topped by the same chocolate mousse along with a new cookie crust, having not been completely thrilled with Emeril's mix of chocolate cookies and graham crackers in the first pie. (Have I mentioned how easy it is to make homemade salted caramel?  SO easy.  TOO easy.  There have been visions of caramel apples and caramel candies and caramel sauce for ice cream swimming in my head since I learned how easy it is.  Yum.) mousse merge 1 As it turns out, pure caramel doesn't adhere well to chocolate cookie crust.  After placing a slice of pie #2 on a plate to serve, I watched as the mousse and caramel slowly slid down the length of the shell that was meant to keep the slice intact and maintain its shape.  Even after an overnight rest in the freezer, it took a mere 5 minutes out before the caramel started oozing from beneath the chocolate mousse, lethargically making its protest at being forced to share the stage with another star. mousse pie-16 Apparently, my parents DO know a little something about desserts - the chocolate mousse is perfect on its own. So, here is my recommendation after this week of experimentation.  Make the chocolate mousse.  Put it into a chocolate cookie crust and place the whole pie in the freezer for a few hours.  Serve with a generous blob of homemade whipped cream.  Pure. Simple.  Delicious.  And if you're dying to try the salted butter caramel, DO!  Just coat an apple with it or drizzle it over ice cream.  It deserves its own spotlight. Or better yet, follow Helen's instructions for her triple-layer mousse.  It looks delicious, and I bet that layer of vanilla mousse would really help to cut the richness of the chocolate and caramel layers. mousse pie revised-1 Chocolate Mousse Pie adapted from Emeril's recipe on foodnetwork.com serves 10 Ingredients:
  • one 9" cookie crust, baked (recipe below)
  • 1 cup plus 2 tbsp sugar
  • 3/4 cup heavy cream, plus 1-1/2 cups
  • 3/4 cup buttermilk
  • 3-1/2 tbsp cornstarch
  • pinch salt
  • 4 egg yolks
  • 4 oz high-quality chocolate (I used 60% cocoa), finely chopped
  • 1 tbsp butter
  • 3/4 tsp vanilla extract
  • 3 tbsp confectioner's sugar
Method:
  1. In a small saucepan combine sugar, 3/4 cup heavy cream, buttermilk, cornstarch and pinch of salt, and whisk until smooth. Place over medium-high heat and bring to a boil, whisking from time to time until the sugar and cornstarch dissolve and the mixture thickens, about 5 minutes.  Continue cooking at a low boil for an additional 5 minutes, whisking constantly.
  2. In a mixing bowl, beat the egg yolks lightly.  Pour 1/2 cup of the hot mixture into the egg yolks and whisk thoroughly.  Pour the egg yolk mixture into the saucepan and whisk over the heat until thoroughly combined and very thick, 1 to 2 minutes.
  3. Pour the mixture into a mixing bowl and whisk in the chocolate, butter and vanilla.  Continue whisking until thoroughly combined (mixture will be very thick).
  4. Cover the mixture with plastic wrap placed directly on the surface of the mixture.  Refrigerate until cooled to room temperature, about 30 minutes.
  5. Place 1-1/2 cups heavy cream in a chilled mixing bowl and add the confectioner's sugar.  Beat until stiff peaks form (I used a stand mixer).  Refrigerate until ready to fold into chocolate mixture.
  6. Remove the chocolate mixture from the refrigerator.  Gently fold in about 1/2 of the whipped cream.  Spoon the chocolate mousse into the cooled, pre-baked cookie crust.  Refrigerate until firm and cool, at least 4 hours.  (Or freeze if you want a really firm pie, one whose bites have more oomph to them. Just remove from freezer about 10 minutes before cutting).
  7. Refrigerate remaining whipped cream until ready to serve with pie.
Chocolate Cookie Crust Ingredients:
  • enough chocolate cookies, cream centers removed, to make 2 cups of fine crumbs (I used one package of Newman O's)
  • 1/4 cup sugar
  • 1 stick unsalted butter, melted
Method:
  1. Preheat oven to 375*F.
  2. Process cookies in a food processor until fine crumbs.  Measure 2 cups into a mixing bowl.  Add the sugar and toss to combine.
  3. Add the melted butter and use your fingers to combine thoroughly.
  4. Press the crumb mixture evenly into a 9 inch pie dish.  Bake for 15 minutes.
  5. Let cool completely before filling.
And if you really want to try a caramel layer, here you go.  The combination is delicious, really, just be glad that the pie keeps well in the freezer because it will take a looooong time to finish it all. Salted Butter Caramel from Tarteltte Ingredients:
  • 1 cup sugar
  • 4 tbsp water
  • 1 tsp fine sea salt
  • 1/2 cup heavy cream
  • 4 tsp unsalted butter
Method:
  1. Place the sugar and water in a medium heavy-bottomed saucepan and bring to a boil over high heat.  Continue to cook until a shade lighter than caramel (it will continue to cook a bit after you remove it from the heat.  if it overcooks the caramel gets a little bitter.).
  2. Remove from the heat and add the salt, stir quickly to dissolve.  Add the heavy cream and butter, stirring constantly with a wooden spoon until completely smooth.  Let cool to room temperature.
Salted Caramel "Mousse" (from pie #1) Once the caramel is cool, fold in the other half of the whipped cream prepared for the chocolate mousse.  The mixture will be much runnier than the chocolate, so layer it on top.  Place in the freezer for at least 4 hours before serving. mousse pie-17 Up next Thursday on Bella Eats Pie:  Apple! And, I'm going to try really hard to get some savory fall dinner posts up in between...
Read More