
Our car winds its way up the narrow gravel road to the top of
Carter Mountain. The windows are cracked, and the almost-too-cold October air slips in and lifts my hair from my face. The early afternoon light is diffused by retreating rain clouds that lend the sky a lovely texture rather than pose any real threat of storms. We bump along the pitted drive, ignoring the dust billowing up from beneath the tires of the [very slow] car full of tourists in front of us. We have no schedule, no place to be, just plans for picking bags full of apples and enjoying this first rain-free afternoon in days.

Once parked we make our way through the crowd towards the renovated barn, dodging bundled-up children being pulled in bright red Radio Flyer wagons by slightly-frazzled parents. The smell of freshly baked apple pie and apple cider doughnuts fills the air as we find the ‘pick-your-own’ information kiosk, grab a bag, ask about availability and set off on our hunt for sweet and crisp Fuji apples. We continue our journey towards the top of the mountain, this time on foot, huffing and puffing just a little as I am reminded again of why I should wear sturdier shoes on these treks. Fifteen minutes later we have found rows full of our target. The bright pink globes dance in the wind and beg to be picked, and I am thankful again that Brian is tall and can reach the otherwise unattainable perfect specimens near the tops of the trees.

We fill our first bag, saving the second for a bin full of bright green Granny Smiths calling our name back at the barn. The pick-your-own trees once dripping with that variety were stripped the previous two weekends during the
Carter Mountain Apple Festival, the bounty already baked into pies and crisps across the city of Charlottesville. Once we’ve gathered more apples than we probably need, stashed a half-gallon of apple cider under an arm and paid for our haul, we make our way back to the car already planning our next trip to the orchard in two weeks, when Pink Ladies will be ripe for picking.

I knew from the first moment that Brian and I started talking about
Bella Eats Pie Month that I would be making an apple pie. Not because of the time of year, or its classic role on the Thanksgiving dinner menu, or the fact that we have a lovely orchard located a mere 15 minutes from our house with trees loaded down with apples. No, I knew that apple pie would be on the agenda because it is my husband’s number one, all-time favorite, could eat it every day, dessert. If I am the director of our kitchen and weekly menus (and truly, I don’t hold all the control), he is the marketing agent for the apple pie, advocating for its place at our table as soon as the first golden light of fall spills through our windows and across the dining room floor.

I really wanted to try something new (to us, at least) for Pie Month, and so started to look into apple pie variations. Initially Brian balked, for even though he is a fan of the apple cranberry pie I make every year, he is truly a classicist when it comes to his favorite dishes and was not keen on the idea of my shaking things up. Until a reader, Hannah, was sweet enough to send me her grandmother’s recipe for Cheddar Apple Pie. Cheddar? Apples? Yum! I’m embarrassed to say that we’d never even heard of such a pie in our household, not even the Wisconsin tradition of layering a slice of cheddar across a warm slice of freshly-baked apple pie. The idea appealed to both of us, especially Brian’s not-so-sweet tooth, and so Cheddar Apple Pie was penciled into the agenda.

A bit more research later, and I discovered that I’d overlooked the
Cheddar-Crusted Apple Pie in the September 2009 issue of
Gourmet. Given the recent, heart-breaking turn of events for one of the most beloved food publications out there, I decided to give that recipe a try, having never been disappointed with a recipe from
Gourmet and wanting to mourn its untimely demise in my own way.

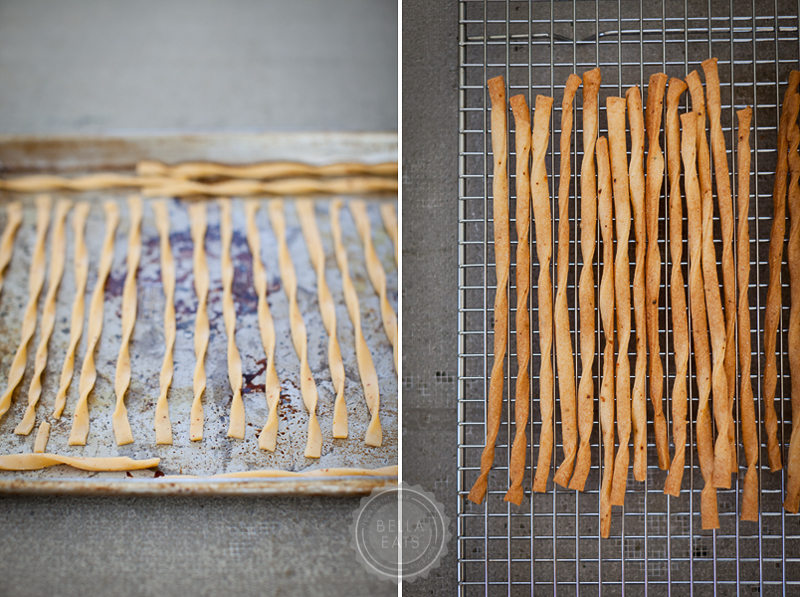
As with most recipes I've tried from within the pages of
Gourmet, this one came together beautifully. Once the dough softened up a bit and stopped giving me a killer upper-body workout, it was a dream to work with. No tears or splits or crumbles except for at the edges. The slight sweetness of the filling was perfectly balanced by the savory tone of the crust, which flaked just as it was meant to and melted away on the tongue. The cheddar added a nice punch that left me wishing I had baked off the scraps leftover after trimming the pie's edge, imagining that pairing those crispy strips with slices of fresh apple would have provided a perfect afternoon snack.
The not-too-sweet nature of this pie was the perfect follow-up to the rich chocolate + caramel pies I was producing last week. If you have loved ones who aren't big dessert fans, who just don't have much of a sweet tooth, this pie is the answer to your "what shall I make" questions. Even Brian, who has been known to pass up cake / cookies / pie / ice cream in favor of an extra helping of meat or mashed potatoes, consumed multiple pieces of this pie in a day. And then did it again the next. This pie is a winner, indeed.

I had an additional apple pie planned for the week, a
classic version shared by
Joy, but a busy weekend and even busier evenings prevented its assembly in our kitchen. Luckily this first pie came out wonderfully, other than a few of my own mistakes that I've noted below the recipe. And, given Brian’s obsession and the ripening of Pink Ladies on the trees at
Carter Mountain Orchard in a short amount of time, I feel certain that I will be making
Joy's pie in the near future and will be sure to share it with you all.
If you're in the mood for more of an apple crisp or crumble, try out
Nana's recipe. You won't be disappointed.
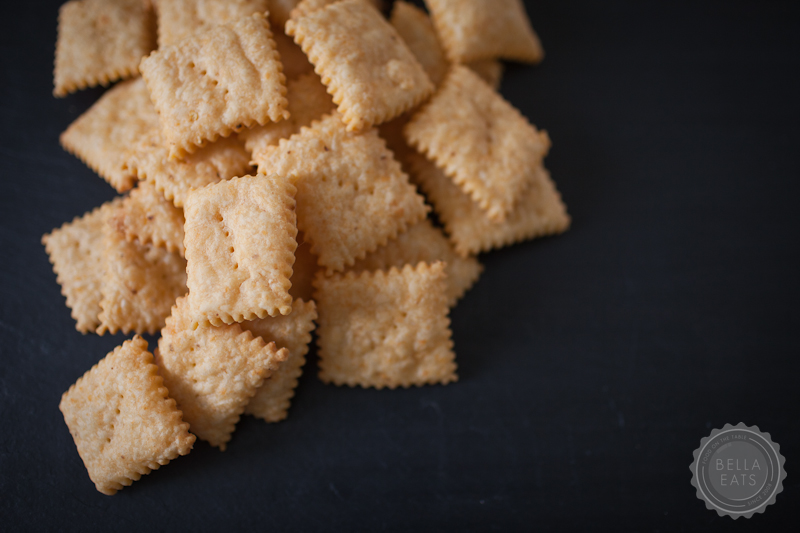
 Cheddar-Crusted Apple Pie
from Gourmet, September 2009 (sniff, sniff)
serves 6 to 8
Cheddar-Crusted Apple Pie
from Gourmet, September 2009 (sniff, sniff)
serves 6 to 8
Pastry Ingredients:
- 2-1/2 cups all-purpose flour
- 1/2 tsp salt
- 1/2 pound extra-sharp cheddar (preferably white), coarsely-grated (2-1/2 cups)
- 1 stick cold, unsalted butter, cut into 1/2-inch pieces
- 1/4 cup cold vegetable shortening, cut into 1/2-inch pieces (I had no shortening, so used more butter instead)
- 6 to 8 tbsp ice water
- 1 tbsp milk (or 1 egg whisked with 1 tbsp water), for wash
Filling Ingredients:
- 3 pounds of apples (I used Fuji and Granny Smith, but will substitute either Pink Ladies or more Granny Smiths for the Fuji next time), about 6 medium apples
- 2/3 cup sugar
- 3 tbsp all-purpose flour
- 1 tbsp fresh lemon juice
- 1/4 tsp salt
- 1 tbsp cold unsalted butter, cut into bits
For the Pastry Dough:
- Stir together flour, salt and cheese in a large bowl. Add butter and shortening and blend with your fingertips or a pastry blender until the mixture resembles course breadcrumbs and the biggest pieces of butter are no larger than a pea.
- Drizzle 6 tbsp of the cold water over the mixture and stir with a fork until incorporated. Squeeze a lump of the dough between your fingers. If it holds together it is ready, if it falls apart it needs more water. Add a tablespoon at a time, testing after each addition until the consistency is right. Do not overwork or your pastry will be tough.
- Turn out dough onto floured work surface and divide in two. Shape each half into a smooth 5-inch diameter disk and wrap in plastic. Refrigerate for at least one hour, or up to two days. It can be frozen at this stage for up to three months.
Assemble the Pie:
- Put a foil-lined baking sheet in the middle of the oven and preheat oven to 450*.
- Peel and core the apples. Slice into 1/4-inch thick pieces. (see note below) Toss apples with lemon juice, flour, sugar and salt until evenly coated.
- Roll out one disk of dough on a lightly floured surface into a 13-inch round. (see note below) Fit into a 9-inch pie plate (mine is glass) leaving a 1/2-inch overhang. Roll out the second disk of dough into an 11-inch round.
- Transfer filling to the shell. Dot with butter (see note below), then cover with the second pastry round. Trim edges, leaving a 1/2-inch overhang. Press edges together to seal then fold under. Crimp edges as desired. Brush top of crust with milk (or egg, my preferred wash) and sprinkle with course sugar. Cut vent 5 vent holes (1-inch long).
- Bake on hot baking sheet for 20 minutes. Reduce heat to 375* and bake until crust is golden brown and filling is bubbling, 30-40 minutes more. (I baked mine for full 40, but should have removed it at 30 as the filling and bottom crust were over-done).
- Cool to warm or room temperature, 2 to 3 hours.
 Notes:
After removing the dough from the refrigerator, let it sit for 5 minutes or so to soften up before rolling it out. And be ready for a workout! The cheese binds this dough together very nicely, which makes it a bit tough to work until you get it pretty thin.
The Granny Smith apples held together nicely, but the Fuji apples were reduced to the consistency of a chunky applesauce. If you're going to use two varieties of apples with different textures, be sure to compensate by slicing the softer apples thicker than the others.
Do not bake this pie on the bottom rack, as I did with my Italian Plum Pie. I'm not sure if it was the addition of cheese in the crust, or the fact that the apples weren't as juicy as the plums (and therefore less likely to soften the crust), but after baking this pie on the bottom rack the bottom crust was overdone, even with less baking time. It tasted just fine, but was tough to cut through with only your fork.

Local
The
Virginia Chutney Festival is this weekend (the 24th) in Sperryville! Go check it out and report back to me since I won't be in town to participate in the festivities!
WriterHouse in Charlottesville is hosting a morning seminar this Saturday (the 24th) with Molly Cox Bryan (author of
Mrs. Rowe's Little Book of Southern Pies and
Mrs. Rowe's Restaurant Cookbook) titled
"Writing About Food - Turning Appetite Into Art and Articles". I SO wish I were going to be in town for this!!! Again, GO and report back to me!
And last, I've just learned of a special dinner being held at
Maya in Charlottesville on November 9th that will feature ALL local food! Participants include two of my City Market favorites, Double H Farm and Roundabout Farm, along with local wine. There are other exciting details, but unfortunately I haven't been able to find any information online. Call 434.979.6292 for additional details and reservations. I'll post more as I learn more, but I can assure you that Brian and I (along with a couple other foodie friends) will be there!


 We were both architecture majors, and each semester arranged our schedule so that we had all of our classes together. On the first day of school we’d get to our studio early to ensure that our desks would be located next to each other in the space where we spent most hours of our days and nights. We’d put a disc-man between us, load it with mixed CDs and plug in a pair of split headphones so that we could listen to the same music as we worked all night long on projects for the next day’s review. Our friendship continued to grow as we saw each other through relationship elation and heartache, as well as the highs and lows of life as a student of architecture. But still we denied any feelings we had for each other, insisting to those around us that we were just friends, never anything more.
 The end of the second year of architecture school brings a make-it-or-break-it moment for its students - a pin-up presentation that shows your best work to a panel of your professors so that they can decide whether or not you show enough promise to proceed in the program. It is terrifying - a time when you search your soul to decide if you are truly made for architecture, and debate possibilities for what you might change your major to if you are not chosen. You are given roughly 36 hours, the time between when your last project of the semester is complete and the pin-up judgement begins, to put together a 4-foot by 8-foot board that expresses who you are as a designer.
Brian and I, of course, spent those 36 hours together, holed up in his apartment working round-the-clock with no sleep. At one point, around hour 30, I was exhausted to the point of tears and hungry for anything other than pizza or Chinese delivery. And so, Brian made me soup.
The end of the second year of architecture school brings a make-it-or-break-it moment for its students - a pin-up presentation that shows your best work to a panel of your professors so that they can decide whether or not you show enough promise to proceed in the program. It is terrifying - a time when you search your soul to decide if you are truly made for architecture, and debate possibilities for what you might change your major to if you are not chosen. You are given roughly 36 hours, the time between when your last project of the semester is complete and the pin-up judgement begins, to put together a 4-foot by 8-foot board that expresses who you are as a designer.
Brian and I, of course, spent those 36 hours together, holed up in his apartment working round-the-clock with no sleep. At one point, around hour 30, I was exhausted to the point of tears and hungry for anything other than pizza or Chinese delivery. And so, Brian made me soup.
 It took a few more months and the demise of our high school relationships for me to outwardly admit the feelings I had for Brian but, looking back, I believe that the moment he handed me that bowl of piping-hot potato cheese soup amidst the biggest deadline of our lives thus far was the moment I knew that there was something more between us.
This soup is still, to this day, my absolute favorite thing that he makes in our kitchen. It has morphed over the years, adjusting with our tastes and food values, but at its core is still the creamy, delicious, heart and soul-warming meal that he made me so many years ago.
Brian's Potato Cheese Soup
serves 4
Ingredients:
It took a few more months and the demise of our high school relationships for me to outwardly admit the feelings I had for Brian but, looking back, I believe that the moment he handed me that bowl of piping-hot potato cheese soup amidst the biggest deadline of our lives thus far was the moment I knew that there was something more between us.
This soup is still, to this day, my absolute favorite thing that he makes in our kitchen. It has morphed over the years, adjusting with our tastes and food values, but at its core is still the creamy, delicious, heart and soul-warming meal that he made me so many years ago.
Brian's Potato Cheese Soup
serves 4
Ingredients:


 Cheese + Chive Buttermilk Biscuits
recipe modified from
Cheese + Chive Buttermilk Biscuits
recipe modified from  Oh yes, it was a weekend filled with indulgent breakfasts. Is that bacon on my plate?!? What?!?
I"ll be sharing another breakfast with you this week, but it is of the sweet variety and involves oatmeal. Get excited, because it is fabulous. :) And its healthier than eggs, bacon and biscuits, so who wouldn't be excited?
I hope you're all having a great week!
Oh yes, it was a weekend filled with indulgent breakfasts. Is that bacon on my plate?!? What?!?
I"ll be sharing another breakfast with you this week, but it is of the sweet variety and involves oatmeal. Get excited, because it is fabulous. :) And its healthier than eggs, bacon and biscuits, so who wouldn't be excited?
I hope you're all having a great week!